Geeetech A20T: First Prints
2023-08-07I’ve written about Assembly and configuration of the Geeetech A20T 3D printer and also Multi-Material 3D Printing With OpenSCAD, Cura and the Geeetech A20T and now it’s time to actually print something!
Straight out of the box
The SD card which came with the printer contains a couple of G-Code files which I assume are tuned up for the printer.
A10TA20Tcube_colored.gco
This is just a cube which is a solid color, a mix of all three extruders. There’s no metadata but there’s only one color change command in there:
M163 S0 P0.2
M163 S1 P0.3
M163 S2 P0.5
M164 S0
It’s weird that this doesn’t include any tool changes at all? To demo printers which are all about filament changes?
A20T-cat.gco
This is a cat with a color gradient. Headers indicate that it was generated with Simplify3D and maybe give us a good start on dialling in decent settings for Cura:
 G-Code generated by Simplify3D(R) Version 4.0.1
; Apr 20, 2019 at 3:15:11 PM
; Settings Summary
;   processName,Process1
;   applyToModels,cat
;   profileName,Default (modified)
;   profileVersion,2017-03-01 08:00:00
;   baseProfile,
;   printMaterial,PLA
;   printQuality,High
;   printExtruders,
;   extruderName,Primary Extruder
;   extruderToolheadNumber,0
;   extruderDiameter,0.4
;   extruderAutoWidth,0
;   extruderWidth,0.4
;   extrusionMultiplier,1
;   extruderUseRetract,1
;   extruderRetractionDistance,10
;   extruderExtraRestartDistance,0
;   extruderRetractionZLift,0.3
;   extruderRetractionSpeed,6000
(etc)
Hopefully we can also learn something from the G-Code.
The color gradient is done by setting the
extruder proportions for every layer rather than
by using the M166 command which isn’t
supported in Marlin 1.1.x.
Let’s try printing it …
 A20-T-cat.gco … well, the first bit, anyway
I stopped it after the first little bit because I don’t really need a plastic cat right now, lucky or otherwise. You can see how it blends colours as the layers change, which is nice.
But this is a really easy model. There’s no travel or retraction needed, no infill, the colour changes are slight and there’s no attempt to flush the nozzle between colours, it’s not really pushing what the printer can do.
All in all, an odd choice for a test print. There’s some other files on the SD card in STL format, but those need to be sliced to print …
Setting up a Cura Profile
I’ve started off using the Ultimaker Cura 5.4.0 built-in profile for this printer.
First Boats
I tried printing off a Benchy using three PLA filaments: blue for the main hull, orange for the trim and white for the infill. I just used the default profile which ships with Cura for this.
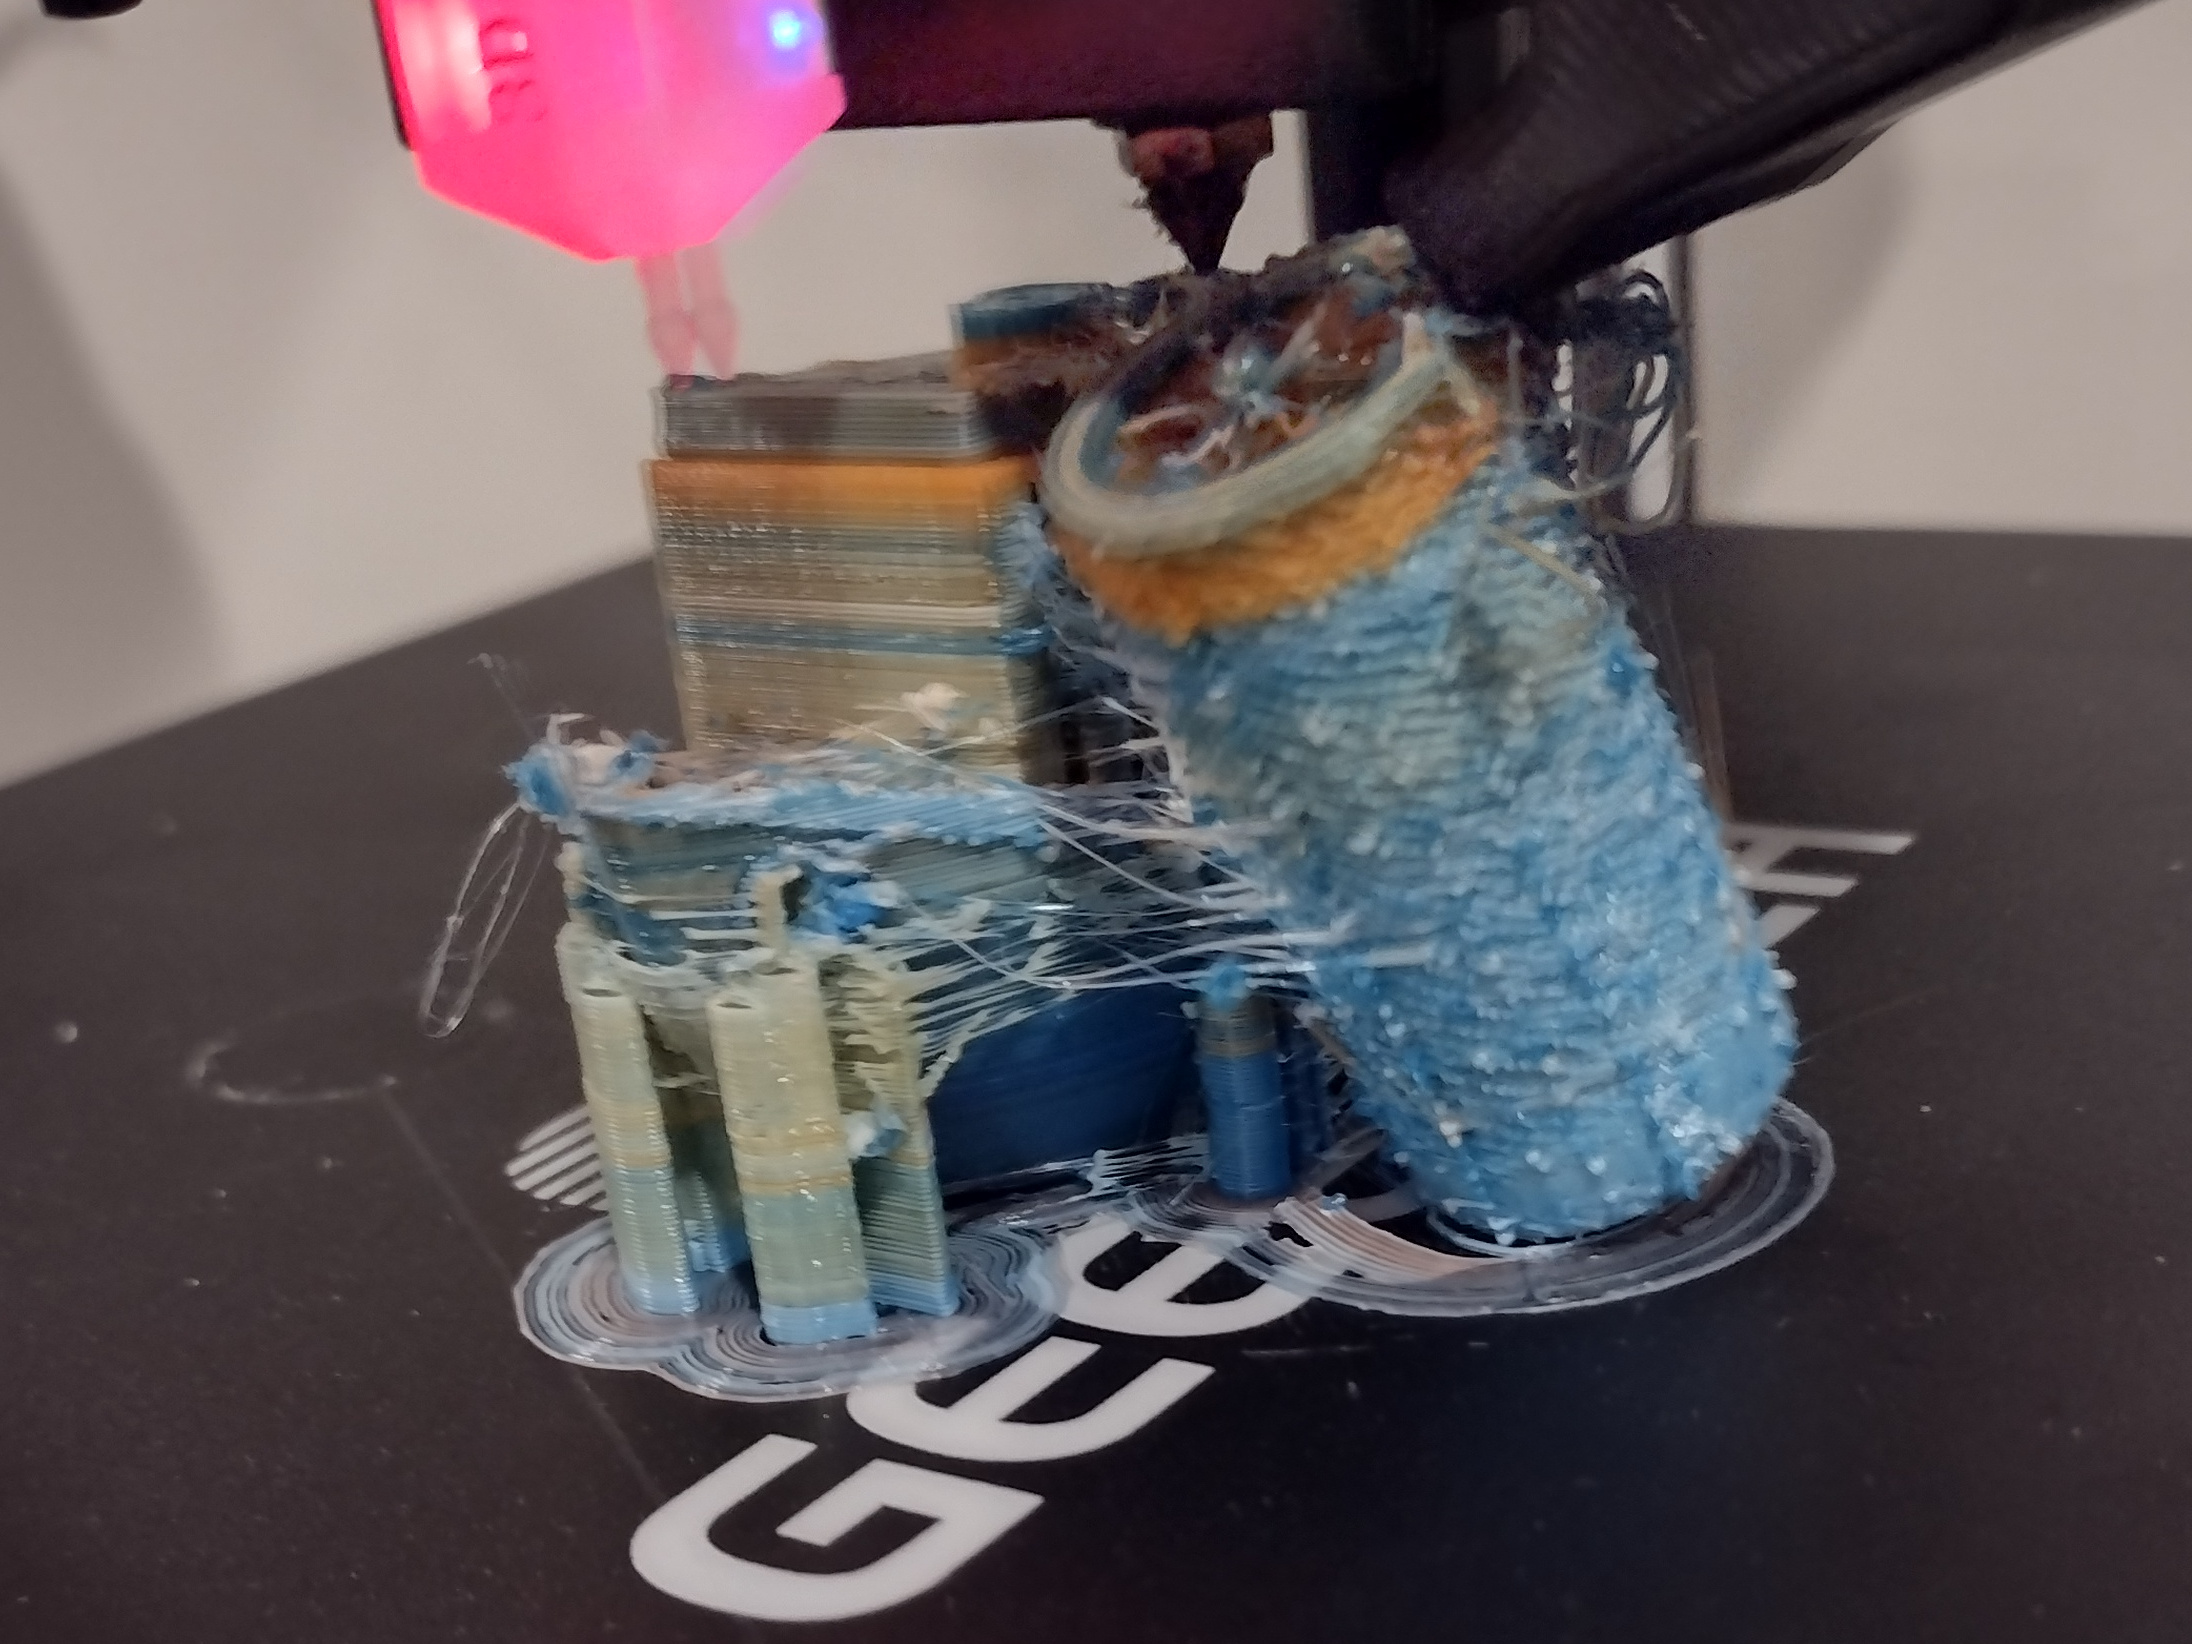
 Not a very successful Benchy
It didn’t work at all well. The boat is a mass of ooze, the colours are all jumbled up, and the colour change tower hit the nozzle, broke off the build plate and then jammed between the boat and the print cooling fan, causing the Y motor to skip and misalign. I stopped it not long thereafter.
Clearly some work needs to be done. It looks like the temperature is far too high, with liquid blobs all over the place, and also the retraction is far too short and/or too fast … it is a mess of spiderwebs. Also the support has bonded far too strongly to the print and is impossible to remove.
Simpler Tests
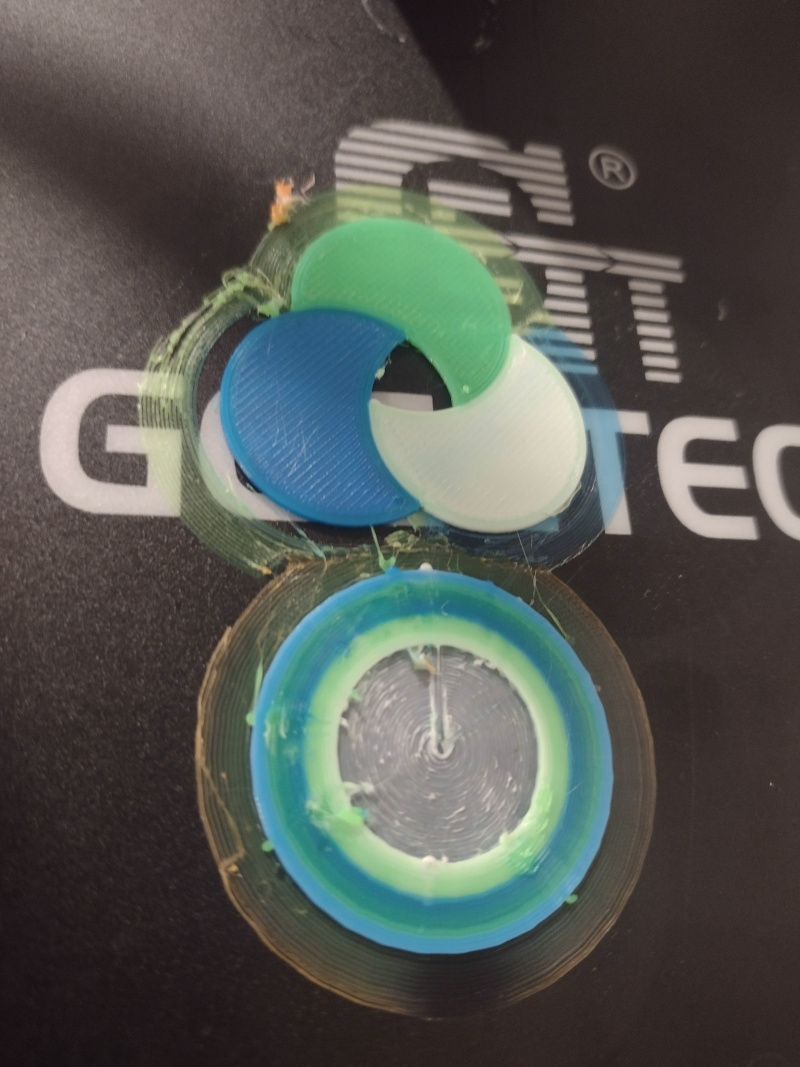
Okay, so Benchy is maybe not a great place to start. Lets do something a lot simpler: three circles, one per extruder.
 Test print: three circles
This worked, so that’s something. There’s a few issues:
- Lousy adhesion: this might have been because I set the bed to cool down after the first layer and it cooled down quite quickly.
- extruder heater turning off too early This has been an issue for a long time so I think Cura aren’t going to fix it. It can be avoided with a post-processing step or, as they note, it could be fixed in Marlin.
- There’s some mixing of colours around the edges, which are the first things to print in each layer. Because they’re generally the skin layers, this is particularly bad, since they’re the most visible.
- There’s a bit of oozing before the print even starts, you can see the remnants in that little orange blob.
Interestingly, the blue one (Extruder 2 == Tool 1) looks pretty good whereas the orange one has a lot of blue on the outside and the white one gets a fair bit of orange. Could this be down to the individual filaments?
Or is it the order in which the elements are printed? Looking at the G-Code, it doesn’t print like:
Layer 0: Segment 1, Segment 2, Segment3
Layer 1: Segment 1, Segment 2, Segment3
Layer 2: Segment 1, Segment 2, Segment3
It does:
Layer 0: Segment 1, Segment 2, Segment3
Layer 1: Segment 3, Segment 2, Segment1
Layer 2: Segment 1, Segment 2, Segment3
Which makes sense: that’s fewer tool changes and therefore less waste. But it also makes the operations less consistent between alternating layers. It should probably be a “Dual Extrusion” option in Cura.
Post Processing
Cura includes a bunch of options for post-processing G-Code, but the simplest one has to be the “Search and Replace” which literally just does a regex match and replace on your G-Code output. To solve the problem of the heaters getting turned off early, you can set up:
- Search:
M104 (T\d+) S0 - Replace:
; M104 \1 S0 removed in post-processing - Use Regular Expressions: Yes
The first line looks for M104 followed by T-and-any-number-of-digits followed by S0.
These are only issued in this particular situation.
Cura also issues a M104 S0 (with no T) at the very end to turn all
the heaters off.
The second line replaces that with a comment, letting you know what was removed.
The \1 is substituted with the bit which matched (T\d+).
The third line lets the search and replace know you want to use those trickier options rather than just matching plain text. See also Python re.sub for more information.
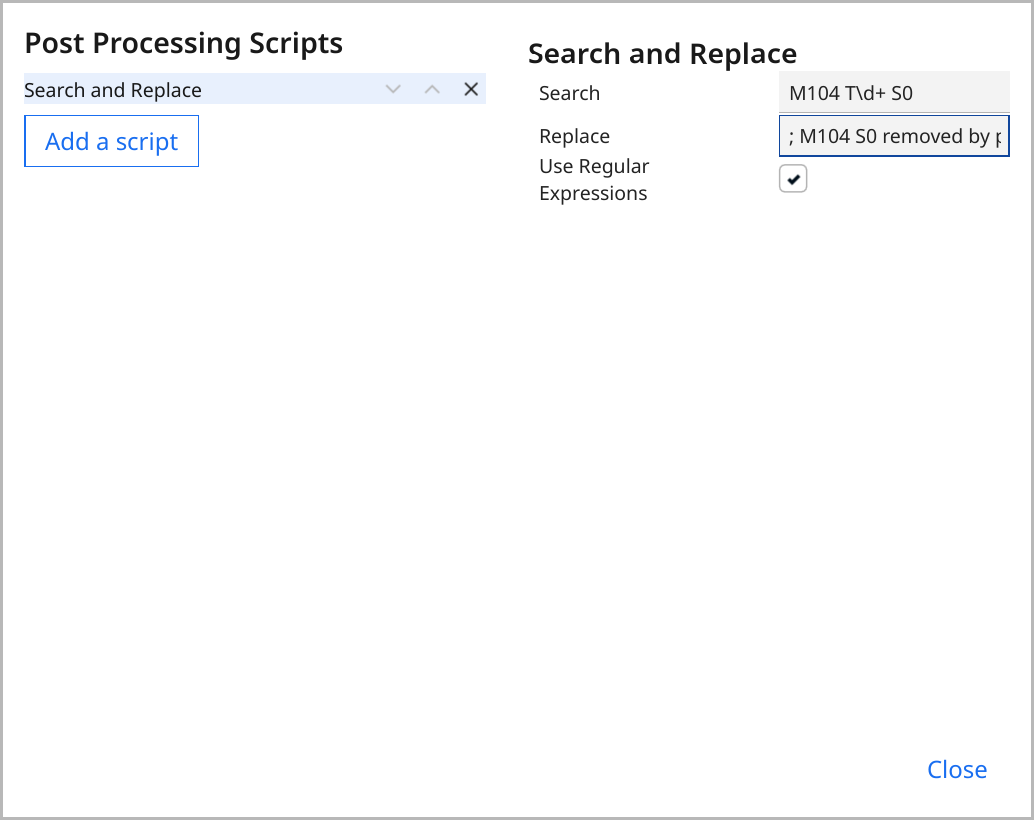 Screenshot of the Post-Processing Search-and-Replace Rule
The result: Cura’s commands which normally turn the heaters off too early get replaced with harmless comments.
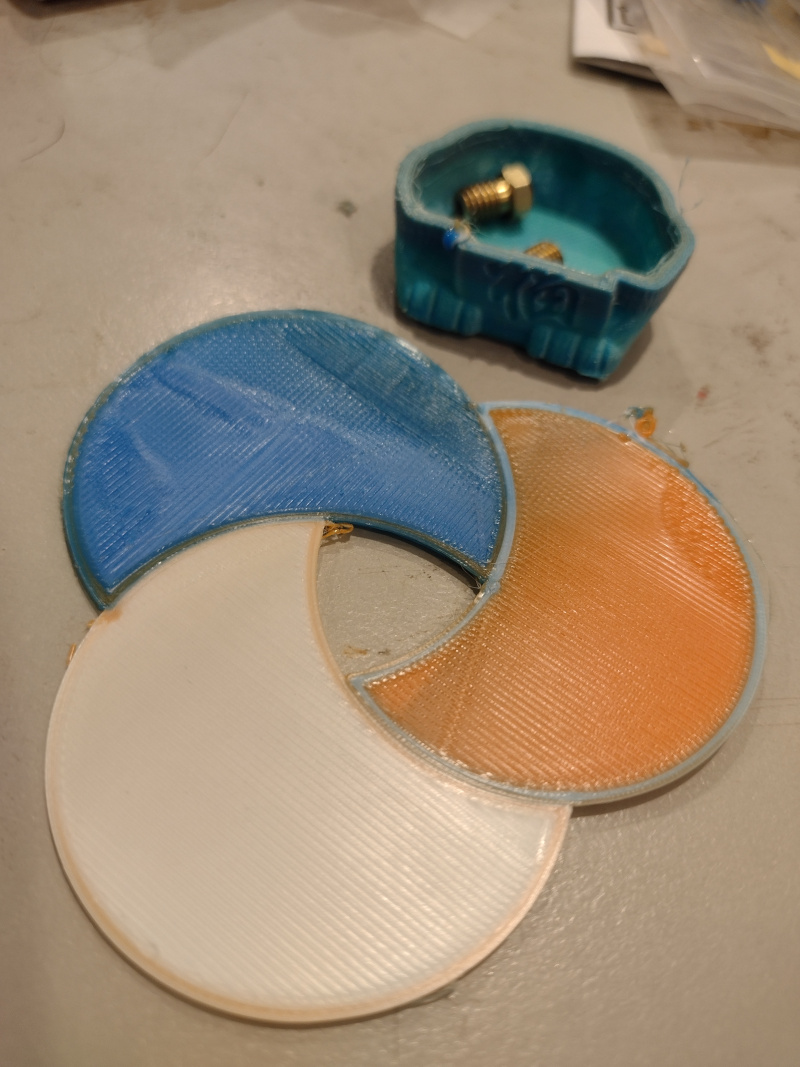
More Circles
Okay, so lets change some stuff:
- Increase bed temperature & leave it at 60⁰C.
- Add a 5mm brim to prevent lifting
- Add the post-process to remove
M104 Tn S0. - Increase Prime Tower Size to 35mm and Prime Tower Minimum Volume from 6mm³ to 30mm³ (surely overkill, but …)
- Slow Nozzle Switch Retraction Speed to 10mm/s
- Make the circles smaller (we don’t need that much plastic to show the bleed between colours)
 Test print: three smaller circles
Okay, well, the overkill worked. There’s three little circles, with very little bleed between them. A pretty wasteful process, but now we know it works we can gradually reduce the prime tower volume and get a better idea of how much is required.
Trying again with smaller numbers revealed two things: firstly, 15mm³ per tool change is not enough to flush the nozzle and secondly a 20mm prime tower is not big enough to hold 45mm³ per layer, which should be kind of mathematically obvious but I didn’t think of it.
Cura doesn’t notice this and just makes a little poop emoji of molten filament which screws the print head up. This would be a good quick fix for Cura: just quickly check that:
π r² h > k v n

r = prime tower size / 2
h = layer height
k = fudge factor, perhaps about 1.5
v = prime tower minimum volume
n = maximum number of tool changes in a layer
So I’m going back up to a 35mm tower and a 30mm³ dump, even though it looks ridiculous.
Ooooooooze
Keyrings
Benchy Revisited
EXTRA STUFF
Other stuff I’ll come back to later:
Adhesion
The parts generally are very well attached to the bed, so after the print finishes I’ve been heating the bed up to 80⁰C and then letting it cool to room temperature. That seems to help to loosen the print a bit. I wonder if I could add an under-bed cooling fan to get it to cool down a bit quicker in the hopes of having parts just “pop off”?
It’s either that or buy a magnetic bed like my cheapy printer has, that makes removal a lot easier plus you can use glue stick if you’re having trouble getting stuff to stick.
Mixing
I’m beginning to think I’d be better off with a Reprap Diamond style printhead which looks like it has a much smaller internal “mixed” volume, or maybe just give up and go with three separate nozzles after all.
Altering the printer so radically might sound a bit crazy but it’d actually be a fairly simple upgrade I think, so long as you don’t mind having the three nozzles share a heater and thermostat.
Of course, something in my tiny brain is telling me: if you can’t decide between 3 individual nozzles and one three-way mixing nozzle, perhaps you need a two-way mixing nozzle plus another separate nozzle … or two two-way mixing nozzles! The possibilities are endless. This way, clearly, lies madness.
Another minor profile annoyance
Even before the individual printer start G-Code, Cura issues these commands (comments mine):
M140 S60   ; set bed to 60, don't wait
M190 S60   ; wait for bed to reach 60
M104 S190  ; set nozzle to 190, don't wait
M109 S190  ; wait for nozzle to reach 190
… which is very almost what it should be doing to heat everything up at once … just swap the middle two lines …
M140 S60   ; set bed to 60, don't wait
M104 S190  ; set nozzle to 190, don't wait
M190 S60   ; wait for bed to reach 60
M109 S190  ; wait for nozzle to reach 190
It’s a minor annoyance, but some of the other printer definitions
seem to get this correct? It turns out that Cura
looks for some magic in the startup G-code,
specifically interpolations of {material_bed_temperature} and
{material_print_temperature}, and if they aren’t present then it
adds some of its own before the machine start gcode.
So if your startup code just uses a set value like M109 S190 instead of
M109 S{material_print_temperature} it won’t detect it, and Cura will prepend
its own one.
Ooooooooze
I’ve had a lot of trouble with ooze on this printer but reducing the temperature and also getting rid of a lot of the preamble stuff seems to have helped.
Also getting rid of unnecessary temperature changes seems to have been a good thing. The slicer issues a bunch of other ‘standby temperature’ commands which aren’t helpful either. I’ve changed my post processing to
- Search:
M104 (T\d+) (S\d+) - Replace:
; M104 \1 \2 remove in post-processing - Use Regular Expresions: Yes
This test print shows one of the problems … this is the underside of layer 0, and the black filament has oozed during warm-up and left some contamination on the print bed, which has ended up in the blue segment.
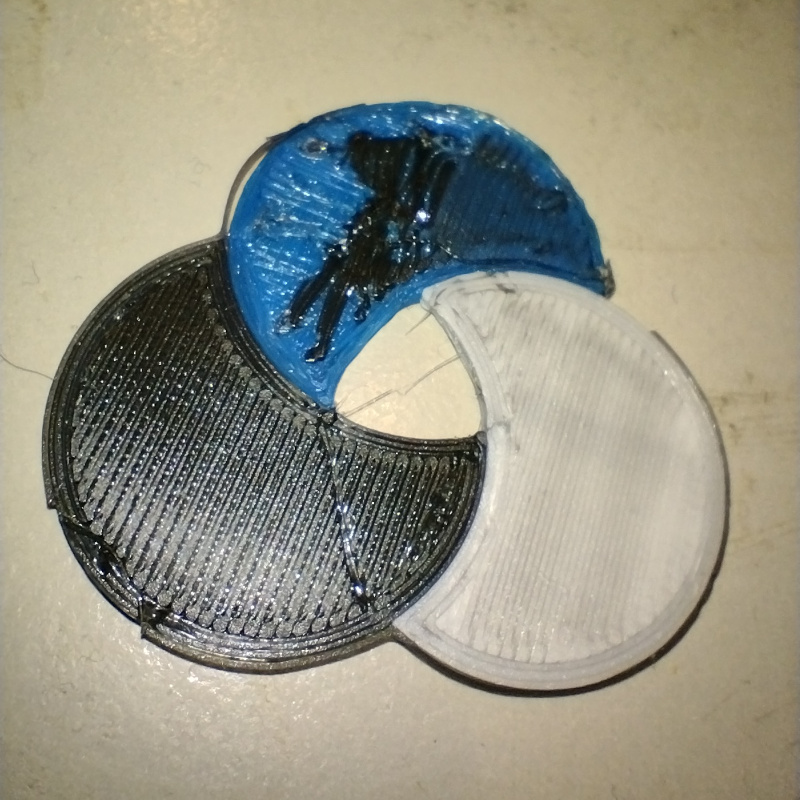 Black filament ooze ruining the blue segment
Adhesion
The parts generally are very well attached to the bed, so after the print
finishes I’ve been heating the bed up to 100⁰C briefly and then letting
it cool to room temperature.
That seems to help to loosen the print a bit, so I’ve added it to the
printer profile’s machine_end_gcode section:
M117 POST HEATING  ; message
M107               ; turn off the print cooling fan
M104 S0            ; turn off the hotend
M140 S100          ; start heating the bed to 100⁰C
G0 X125 Y125 Z250  ; lift the head up out of the way
M190 S100          ; wait for bed to reach 100⁰C
M190 R50           ; wait for bed to drop back to 50⁰C
M140 S0            ; turn the bed heater off
M117 FINISHED!     ; message
M300 P500          ; beep!
The M140 before the G0 means that the bed is already heating up while
the head is being raised, and the M190 R50 makes the printer wait until
the bed is cooled down before announcing it has finished.
(you know what would be great for this? A bed cooling fan underneath …)
Adhesion was an issue when I tried to print text right down to layer 0 as the little disconnected letter pieces didn’t adhere well to the bed. This could probably be fixed by ensuring that the main, connected part of the layer was printed first and the letters were just filling in the gaps.
Keyrings
One of the things the kids got a real kick out of a few years back were the keyrings / bag tags I printed off for them, especially the kids with less common names.
Apparently that’s still cool 4 years later so I made some multi-coloured ones …
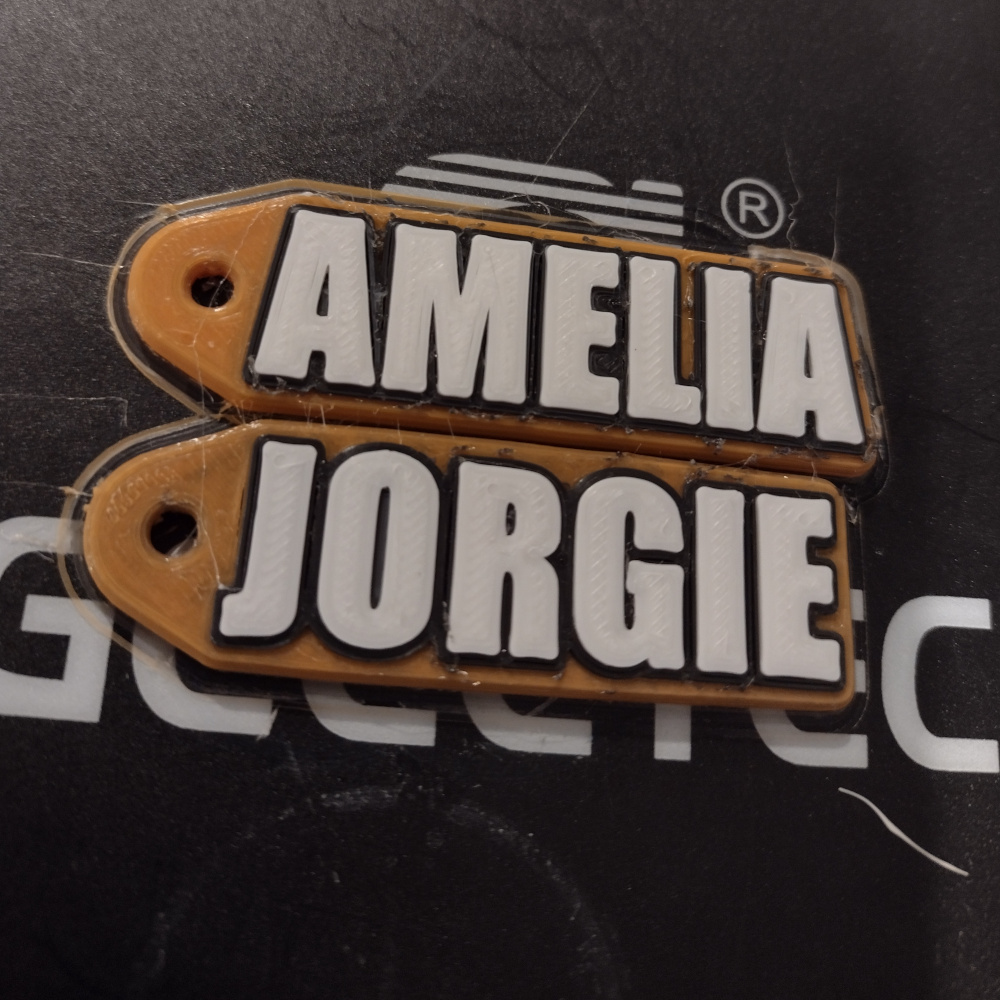 Keyrings I printed for Amelia and Jorgie
… there’s a small amount of very fine ooze but overall I’m pretty happy with these. Most of the stray stuff just brushed off.
I’ll probably redo them with a slightly wider orange border as they look a little cramped, but otherwise I’m pretty happy with them. I’ll also change the way the layers interleave to make the white letters “deeper”, but it’s okay for now.
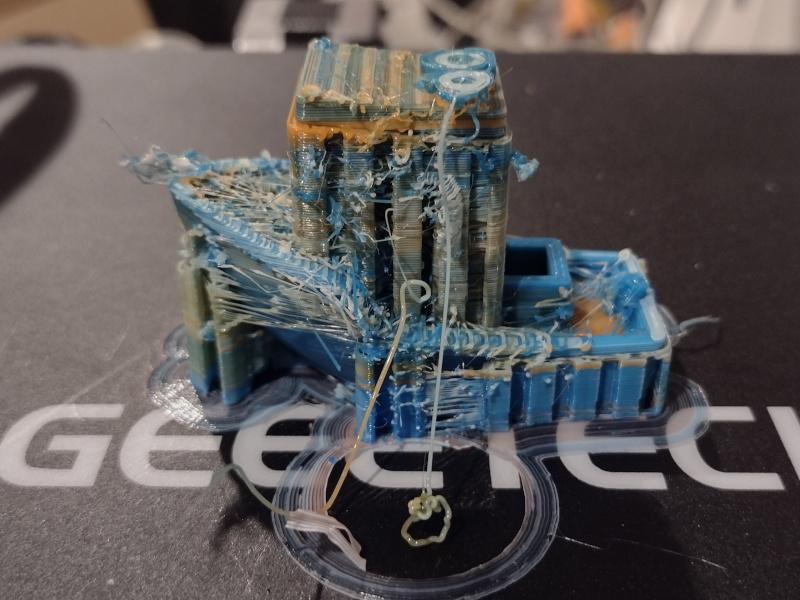
Benchy Revisited
With a success under my belt (finally) I thought I’d give Benchy another go. The first few layers didn’t look so bad …
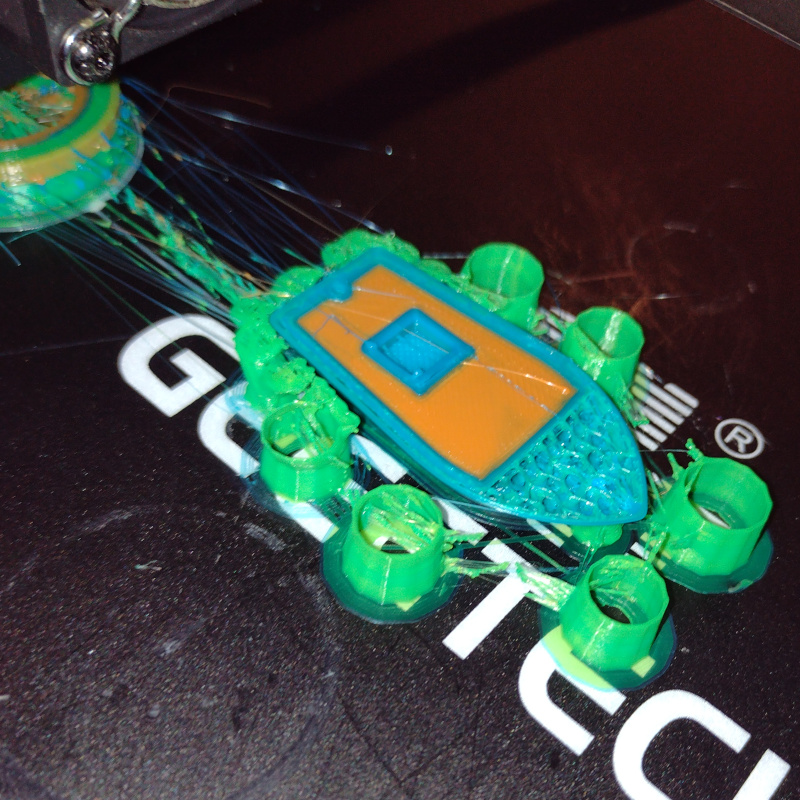 Multicolour Benchy, the first few layers
… but when I came back it had developed into full blown Cthuluoid horror, thanks to insufficient retraction. The filament change retraction seems pretty good but the travel retraction is way too small and spiderweb-like ooze is everywhere!
 Spiderwebbed Benchy
In the end I was able to scrape a lot of the crap off but it’s still a pretty sad print. The orange filament feeder may have been slipping a little as well as the lower orange parts look okay but the upper ones look quite patchy.
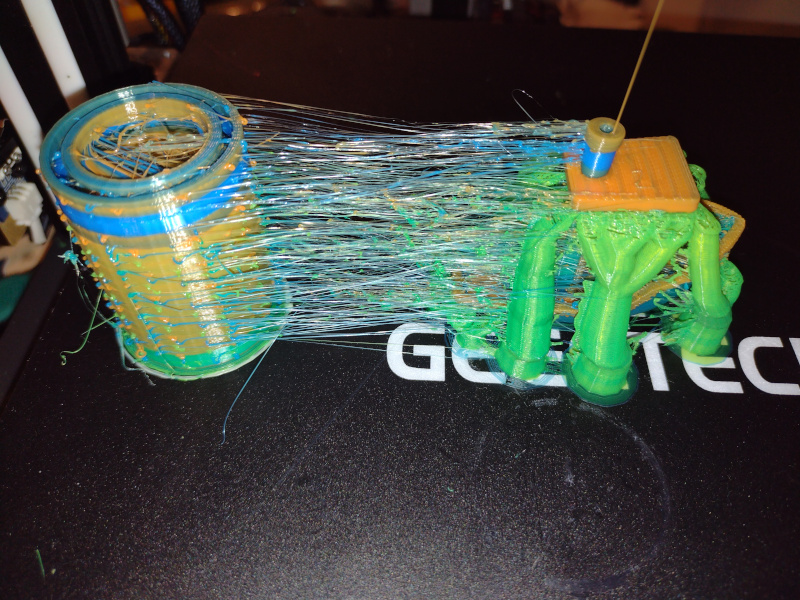
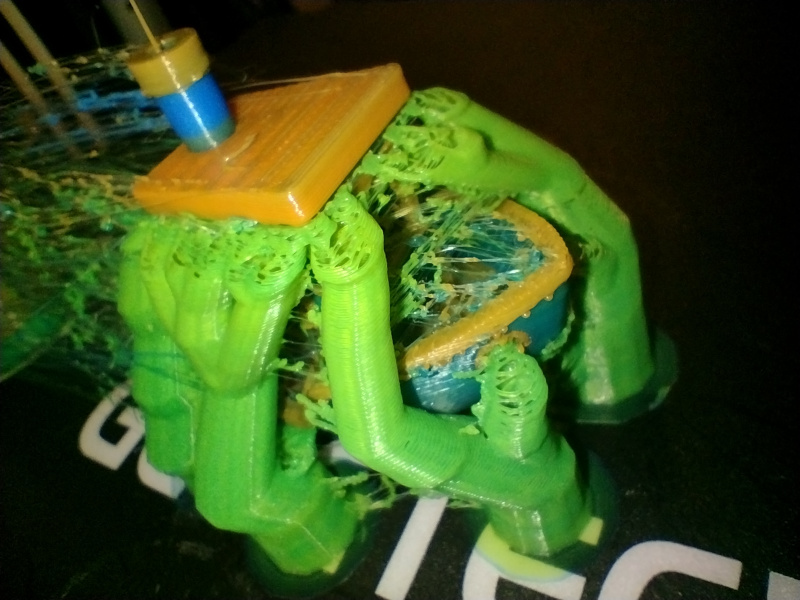 Leviathan attacks!
The tree supports look cool but might not have been necessary at all either, most of them are for little details which would probably just hang there on their own, and the roof is pretty small and has walls at either end so might have been okay too.
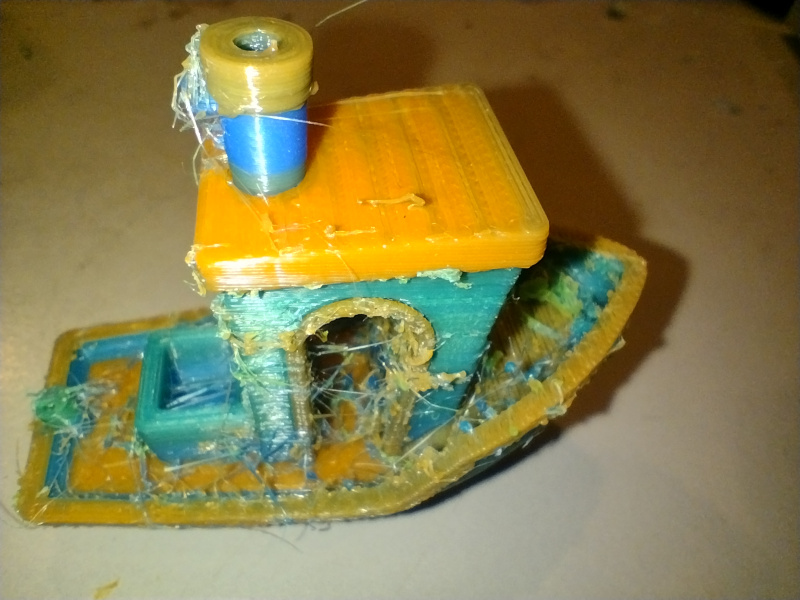 Rough but surviving Benchy
I’ll try a monochrome Benchy and try to get the supports and retraction sorted out before diving back into multimaterial land again!
Temperature Changes
Interestingly, even though I set all the temperatures to 190⁰C and
also added a post-processing script to get rid of all the individual
extruder temperature commands, the printer still pauses quite often
to warm up. I think this is just because M109 S190 introduces a
pause even if the hotend is already right on 190, perhaps so it can
take two measurements and make sure it isn’t changing.
Yield
By “yield”, I mean what percentage of the input material gets turned into useful output material.
The cleaned up Benchy weighed in at 11 grams. The prime tower dwarfed it at 26 grams. Plus another gram or two in hair and supports. So about 28% yield.
This seems pretty terrible, but bear in mind that if we printed 8 Benchys at once we’d still only need the one prime tower, so that’d be a 76% yield
Or if we printed a huge, triple-sized Benchy it would weigh 27 times as much (297 grams) and the prime tower would only be tripled, for a 78% yield.
Less priming material would have been wasted if I hadn’t made the support tree out of a different material.
But still, multi material printing for individual small parts is pretty wasteful.
A Tale of 3½ Benchies
It’s improved a lot since that first print, which shows how much difference tuning the profile can make:
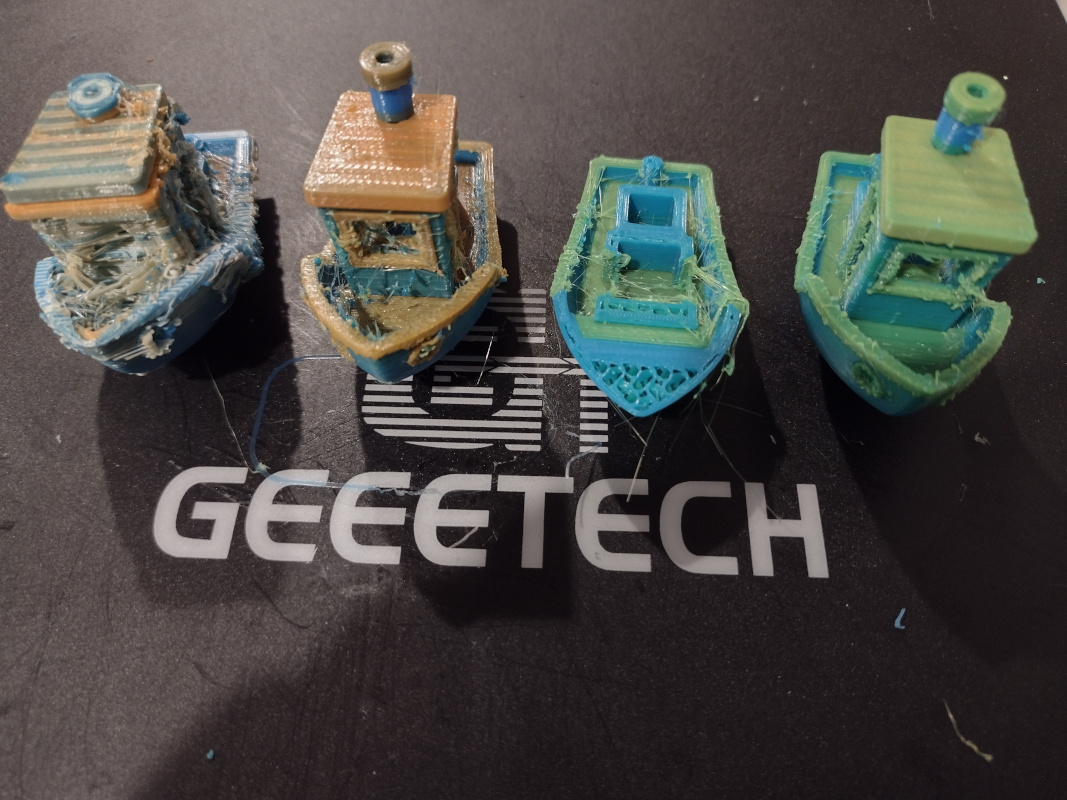 3½ Benchies
I’ll keep working on tuning the printer settings and hopefully we’ll have a new article and a competent Benchy print soon!
But first: PyConAU!