Boot Naked Linux
2026-05-19 — 2026-06-18When I was a kid, computers weren’t coddled and left running 24/7, when you were done with them you switched them off, and when you wanted them again you just switched them on and within a second or so they’d be loading whatever was in their disk drive.
There was a brief moment in the early 2000s where the newly introduced SSDs made booting quick but as always the tech industry has taken up the slack until even a 16 core monster with a fast SSD still takes a minute to get its feet under it.
So I wanted to try an alternative. Keep the Linux kernel but strip away everything else I could. Here goes … well not quite here goes nothing, but here goes a lot less.
UPDATE: As per long tradition, while trying to fix a couple of details I found “Building a tiny Linux from scratch” which does most of what I do here but in Rust and a year ago, so that’s worth a look too.
Hello, World!
The first thing a Linux system does is run an “init” program of one sort or another which loads all the other processes and configurations and stuff. There’s nothing too special about this program, it’s just a regular executable or script, and there have been a few different approaches taken over the years in any case.
So we can write a new one in C … here’s init.c:
#include <stdio.h>
#include <stdlib.h>
#include <sys/reboot.h>

int main(int argc, char **argv) {
    fprintf(stderr, "Hello from init.c!");
    reboot(RB_POWER_OFF);
}
All it does is print a message, and then reboot the computer.
If our init process exits the kernel panics, so instead of busy waiting1
or sleeping forever or whatever, we use reboot(RB_POWER_OFF) to shut the
virtual machine down in an orderly manner.
Making initrd
Modern Linux supports quite a complex multi-stage process. There’s a lot of resources out there, and a lot of them are 20 years out of date, and there have been changes but here’s a summary of how I think it works right now, as of 2026 and Linux 6.8 or thereabouts:
- A boot loader runs with a kernel and a dummy filesystem called ‘initrd’.
- The kernel attempt to unpack the ‘initrd’ file into an ‘initramfs’, a
root filesystem in RAM which allows initialization tools to run.
- it looks for a file called
/init(or whatever is specified in therdinit=kernel parameter) - if it exists, it runs it and that process takes over initialization.
- it looks for a file called
- Otherwise, it falls back to:
- mount the root partition specified by the
root=kernel parameter - mount the
devtmpfsfilesystem at/dev - run
/init(or whatever is specified in theinit=kernel parameter) from that.
- mount the root partition specified by the
- Otherwise, or if the init process exits, it kernel panics.
Most modern distros use the first branch: quite a large initrd filesystem is
provided so that modules and firmware can get loaded before attempting to
boot the real filesystem.
The initrd file which my PC boots from is 73MB and according to lsintramfs
it contains 2163 files!
There’s a few examples of how to
construct a filesystem with a
replacement for init
but I wanted to go even simpler and replace the entire initrd.
If we compile our example code statically, eg: containing all the libraries it
needs, we can make our own initrd with only one file in it:
gcc -static init.c -o init

echo 'init' | cpio -o --format=newc | gzip -c > initrd
about cpio
cpio is a very weird and ancient program with a command line
which makes tar look user-friendly.
But let’s not worry about the details for now.
I will note that, later, if you get a kernel message:
Initramfs unpacking failed: no cpio magic
… it means that either the cpio format or the compression or something similar isn’t compatible with your kernel. The kernel will attempt to continue, but a later error message like:
check access for rdinit=/init failed: -2, ignoring
… means that either the initramfs didn’t happen or your binary is
in the wrong place (-2 is -ENOENT which means file not found).
You might also get a message about incompatible architectures.
This message happens pretty early in the boot process, which attempts to
continue anyway, so you’ll have to look back carefully.
Whereas if you see:
Trying to unpack rootfs image as initramfs...
… and then nothing else, that’s a good sign. It never logs that it was successful until much later when it should hopefully say:
Run /init as init process
Incidentally, if you’re looking to pack many files into a cpio archive, you want something along the lines of:
(cd $SOURCE_DIR; find . | cpio -o -H newc) | gzip -c > $OUTPUT_FILE
The whole thing about piping in a list of files probably seems
perverse but cpio is older than tar, older than shell filename
globbing so perhaps we can forgive it
Virtualized
Getting this going on real hardware would involve an irritating amount of USB key swapping, so I’m using QEMU to make a virtual system to experiment with.
QEMU lets you boot from just a kernel and a filesystem image on the command line.
For now, rather than proper QEMU I’m using KVM to run a virtualized
system. For full emulation, you can also run these examples with
qemu-system-x86_64, or whatever the appropriate emulator is for
your system. It’s slightly slower but otherwise works the same.
First we need a kernel, I’m just using the current kernel
from my machine but the /boot/vmlinuz file is readable by root only so first
we make a copy of it in our working directory and change its ownership:
sudo cp /boot/vmlinuz .
sudo chown $USER:$GROUP vmlinuz
If you can be bothered building your own cut-down kernel that’d be even better.
We now have our two binary files, the kernel vmlinuz and
the init image initrd which contains only our program
init.
So we can boot our system with:
kvm -m 1G -nographic -kernel vmlinuz \
    -initrd initrd -append "console=ttyS0"
The -nographic and -append "console=ttyS0" options give us a terminal console
to monitor stderr on rather than popping up a graphical console.
When the kernel starts up, it unpacks our initrd into a ram disk, and
runs our init binary:
[    0.000000] Linux version 6.8.0-111-generic (buildd@lcy02-amd64-088)
[    0.000000] Command line: console=ttyS0
[    0.489390] Trying to unpack rootfs image as initramfs...
[    0.805419] Run /init as init process
Hello from init.c!
[    0.807535] reboot: Power down
(abbreviated)
Devices
Even if we don’t want any filesystems, we might want some permanent storage.
But at the time our /init runs, we haven’t mounted a root filesystem yet,
so there’s no devices available!
Devices are made available using a kernel mechanism called “devtmpfs” so the
first thing we have to do is activate that. We can mount
devtmpfs from our C program using mount("devtmpfs", "/dev", "devtmpfs", 0, NULL).
QEMU can present a host file as a block device on the guest using
the -hda option, the file will appear to the guest as /dev/sda, so let’s
modify our code from before to mount the devtmpfs, open /dev/sda
and read the first few bytes from that file:
#include <stdio.h>
#include <stdlib.h>
#include <unistd.h>
#include <sys/mount.h>
#include <sys/reboot.h>
#include <arpa/inet.h>

int main(int argc, char **argv) {
    fprintf(stderr, "Hello from init.c!\n");
    mount("devtmpfs", "/dev", "devtmpfs", 0, NULL);

    int fd = open("/dev/sda", O_RDWR);
    uint32_t buffer[2];
    read(fd, buffer, sizeof(buffer));
    close(fd);

    fprintf(stderr, "Read %08x %08x\n",
        ntohl(buffer[0]), ntohl(buffer[1]));

    reboot(RB_POWER_OFF);
}
(yeah, I know, proper C code needs to be scattered with return value checks and sensible reports of errno. I’ve left these out for clarity.)
Before we can run this we need a disk image. Let’s make some random bytes in a file:
dd if=/dev/random of=diskimage bs=1K count=1K
Then we can compile and run this like before:
gcc -static -o init init.c

echo 'init' | cpio -o --format=newc | gzip -c > initrd

kvm -m 1G -nographic -kernel vmlinuz \
    -initrd initrd -append "console=ttyS0" \
    -no-reboot -hda diskimage
… and end up with output something like (edited for brevity):
[ 0.000000] Linux version 6.8.0-111-generic (buildd@lcy02-amd64-088)
[ 0.000000] Command line: console=ttyS0
[ 0.010975] Memory: 975024K/1048056K available (22528K kernel code, 4438K rwdata,
14412K rodata, 4924K init, 4788K bss, 72772K reserved, 0K cma-reserved)
[ 0.493923] Trying to unpack rootfs image as initramfs...
[ 0.712522] ata1.00: ATA-7: QEMU HARDDISK, 2.5+, max UDMA/100
[ 0.713091] ata1.00: 2048 sectors, multi 16: LBA48
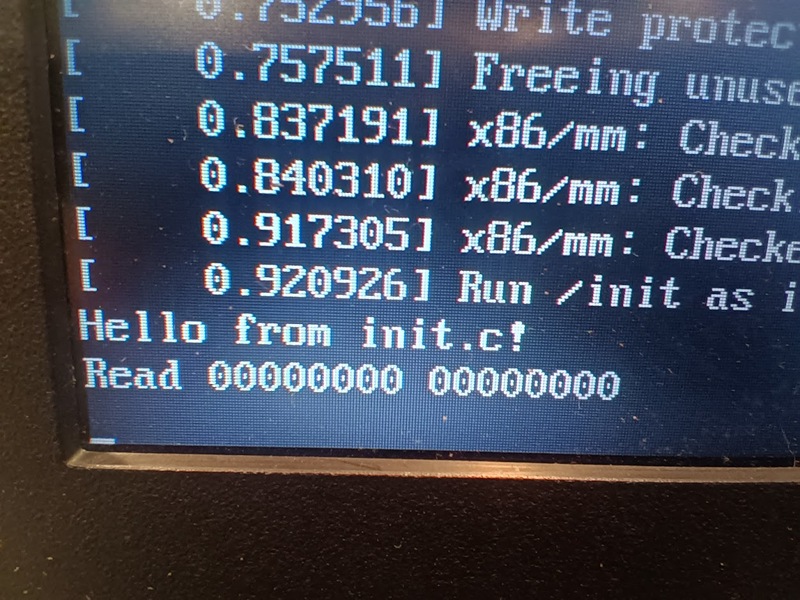
[ 0.816634] Run /init as init process
Hello from init.c!
Read 4463823c a5c37e77
[ 0.819849] reboot: Power down
So there we go, less than a second from power-on to running a program and reading from disk.
Booting real hardware
There are a lot of conflicting instructions out there, and most of them seem to assume you’re trying to update the bootloader of the system you’re using, rather than adding EFI booting to a USB stick, but this is what worked for me:
- plug in the USB key
- use lsblk to make absolutely sure it’s the right one (in my case, it’s /dev/sda, but be careful as these commands will trash whatever drive you’re pointing them at.)
- use
dd if=/dev/zero of=/dev/sda bs=1M count=1to clear the boot sector and partition table completely. - use
sudo cfdiskto set up some partitions:- Format the device as “dos”
- Create a partition of type “EFI” (hex id
ef) with 512M size and mark it as bootable. - Create another partition for later, leave the type
“Linux” (hex id
83) for now
It should end up looking something like:
                       Disk: /dev/sda
     Size: 3.76 GiB, 4037017600 bytes, 7884800 sectors
             Label: dos, identifier: 0xdeadd0d0

Device    Boot   Start     End Sectors Size Id Type
/dev/sda1 *       2048 1050623 1048576 512M ef EFI (FAT-12/16/32)
/dev/sda2      1050624 7884799 6834176 3.3G 83 Linux
Plenty of places seem to say the partition table has to be of type GPT and the EFI partition of a special type within that, but this is what my Mint Linux installer USB looked like and this is what worked for me on this crappy laptop.
Now we can make the file systems on our partitions:
sudo mkfs.fat -F 32 /dev/sda1
sudo mkfs.ext3 /dev/sda2
In theory UEFI can load multiple files from multiple locations, and run
a little script called startup.nsh, and stuff like that, but this laptop
refused to pay any attention to any of that, and the only way to get it
to boot happily was to create a file called /EFI/BOOT/BOOTX64.EFI.
So I needed to make a “unified kernel” which contains a loader stub,
the kernel itself, and the initrd file which contains our program.
We can do this with the ukify tool:
sudo apt install systemd-ukify systemd-boot-efi
ukify build --linux=vmlinuz --initrd=initrd
Then we just need to copy the new unified kernel file into the right place:
sudo mount /dev/sda1 /mnt
sudo mkdir -p /mnt/EFI/BOOT
sudo cp vmlinuz.unsigned.efi /mnt/EFI/BOOT/BOOTX64.EFI
sudo umount /mnt
… and go boot the USB stick!
And then realize that it reboots too quick to get a photo of, and
add a sleep(5); in there. And then boot it again, and take a
photo:
Tiny Kernel
At the start of all this I just copied the Linux kernel from my running desktop: this is a Ubuntu install and pretty hefty as kernels go, with support for many things not relevant to our one-program-at-a-time project. It’s pretty easy to build a new Linux kernel though:
git clone https://github.com/torvalds/linux.git
cd linux
make tinyconfig
make menuconfig
This will get you to the linux kernel configuration menu, a wonderful text menu system with a thousand options which has been baffling new users for about 30 years now.
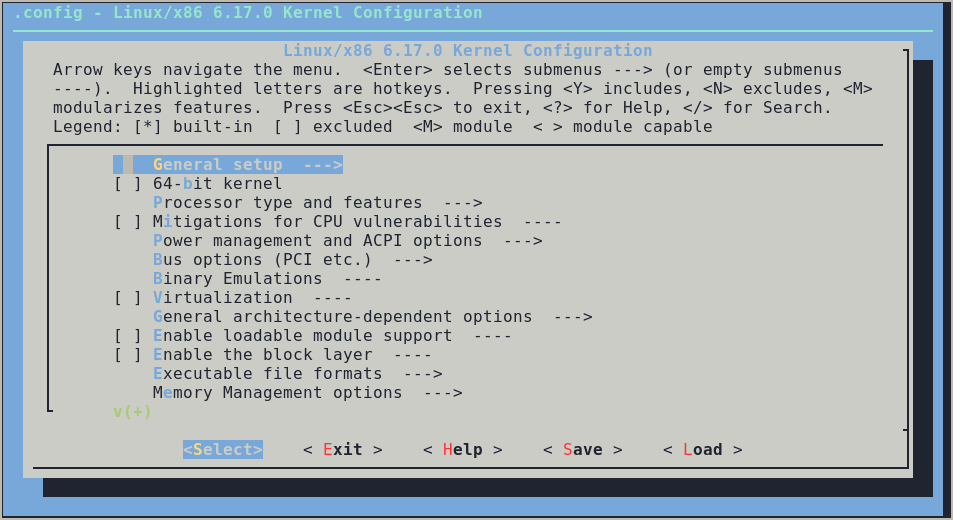
make tinyconfig switches off just about everything, too many things in fact.
As per “Building a tiny Linux from scratch”
some things have to be switched back on for our kernel to work.
Configuring
I’ve tried to lay these out in order to make it possible to pick your way through the menus:
-
“General setup”
-
“Local version”
I set this to “tiny” to make it easier to tell which kernel is which
-
“Initial RAM filesystem and RAM disk (initramfs/initrd) support”
More options will appear. I kept “Support initial ramdisk/ramfs compressed using gzip” and switched the others off, we might as well have only one decompressor in th kernel.
“Initramfs source file(s)” is intriguing and I’ll come back to this.
-
Compiler optimization level
I changed this to “Optimize for size (-Os)”
-
“Configure standard kernel features (expert users)”
Never mind the scary name. This is both a toggle (hit space) and a nested menu (hit enter) which is massively confusing, and the contents are different depending on if it is switched on or off.
-
“Multiple users, groups and capabilities support”
I’ve left this off for now because we don’t really need it.
-
“Enable support for printk”
You can save a bit of space by switching this off, but Without it you won’t know why the kernel isn’t starting.
-
-
-
“64-bit kernel”
Even the shittiest laptop I’ve got laying around here is 64 bit. If you pull something even older out of the junk pile, you might prefer 32 bit.
-
“Processor type and features”
This depends on your target platform too, but I chose to turn on “Symmetric multi-processing support” and set “Maximum number of CPUs” to 4, but turn off the “Cluster scheduler support” and “Multi-core scheduler support”
-
“Enable the block layer”
I think this is necessary to access the block devices like “/dev/sda1” but I turned off “Legacy autoloading support” and “Allow writing to mounted block devices”
-
“Executable file formats”
-
“Kernel support for ELF binaries”
Our
initprogram is compiled to ELF format, we could probably compile it to an older format but there’s no real advantage. I’ve left “Kernel support for scripts starting with #!” off though because there’s no shell where we’re going …
-
-
“Device Drivers”
-
“Generic Driver Options”
-
“Maintain a devtmpfs filesystem to mount at /dev”
This is how we actually find devices on the system.
-
-
“Character devices”
-
“Enable TTY”
We definiely need this to communicate with our program …
-
“Serial drivers”
… and our ‘qemu’ emulation provides the text console as a fake serial device, so I turned on “8250/16550 and compatible serial support”
-
-
“Graphics support”
-
“Frame buffer devices”
Just for fun I turned this on with just “Provide legacy /dev/fb* device”, it’ll be interesting to see if our program can actually do gasp graphics!
-
-
-
“File systems”
We may not need them immediately, but I switched on “The Extended 3 (ext3) filesystem” and “The Extended 4 (ext4) filesystem”
-
“DOS/FAT/EXFAT/NT Filesystems”
I also switched on “MSDOS fs support” and “VFAT (Windows-95) fs support” and “exFAT filesystem support”. It might be handy to be able to read more files out of that EFI partition.
-
-
“Kernel hacking”
Again, don’t be put off by the menu name. I just went into “printk and dmesg options” and set “Show timing information on printks” which gives the printk messages nice timestamps.
If you want to make the kernel with a UEFI stub, you need to do things out of order. First go to “Power Management and ACPI options” and switch on “ACPI”. Then you can go back to “Processor type and features” and “EFI runtime service support” and “EFI stub support” should be active.
Building
Once you’ve waded through all that, you can just make -j 8 to build
a new kernel. Depending on exactly what options you included, the compiled
kernel should be 1-2 MB instead of the 16MB vendor kernel. Of course,
the down-side is that you probably won’t know what feature you missed until
your code tries to use it!
Is this worth bothering with?
Hard to say. It saves a little bit of space, boots a bit quicker, and removing unused parts of the kernel may well improve the security of a device since there’s less “attack surface” to go wrong.
There’s also the possibility of compiling in our initrd system, reducing
even further our reliance on external files. That combined with the EFI
loader stub option means we’d only need exactly one file to load our program
from boot.
Also, we’re going to need to build our own kernel to target more interesting platforms.
Why not …?
Why not UEFI?
We talk above about a “stub” which loads the Linux kernel from EFI.
And we’re not using a very large proportion of the Linux kernel anyway.
So rather than using the Linux kernel at all,
why not just write a binary for EFI??
The specifications are weird but they’re available and
Well, mostly familiarity I guess, having the usual libc printf and
so on available is kind of reassuring. And it makes it a lot easier to
‘dual boot’ our code as a process in a regular Linux environment, for
debugging or convenience.
There’s libraries but I don’t think they
support mmap or anything similar.
But this is definitely worth investigating further.
Why not Rust (etc)?
Yeah, so far I’ve been looking at everything in C because that’s what I’m most familiar with, but yes I’m aware that there have been languages written since 1999 and there may even be some advantages to using them.
TO BE CONTINUED
Next up: Forest for the trees, an adventure in structured data on our minimalist system …